In my previous post about Workload Identity Federation I went through the details of how the techonology actually works. In this one we'll see how to set up our own Kubernetes cluster (running anywhere) to act as an External Identity Provider (IdP) for the purposes of authenticating with Entra ID.
While the initial title of the presentation I was giving on this promised the listeners a secret-free utopia, unfortunately not all things are as easy as that. Here we will need to manage some secrets to generate the service account tokens. Note that this is for demonstration purposes and in a real world scenario you would need to think of how to manage these certificates in a secure way.
In short
Here's what we need to do.
- Generate RSA keys for our cluster
- Generate OpenID Connect Discovery and JWKS documents
- Host the documents in a publicly available endpoint
- Configure Kubernetes Cluster
- Create an Entra ID app registration or a user assigned managed identity
- Create a Kubernetes service account
- Configure and deploy the azwi Mutating Admission Webhook
- Deploy a workload that utilizes the service account
Let's take a closer look at each step next.
Some of the steps will need the Azure AD Workload Identity CLI (azwi) installed.
Full code can be found here so you can also follow along.
Generate RSA keys for our cluster
These keys will be needed for configuring the Kubernetes cluster service account tokens to be signed by the private key, and then on the other side, allow Entra ID to validate the tokens with the public key.
A simple way to generate these is the openssl tool. Again, this is for demonstrative purposes and managing these is out of scope of this post.
echo "Generating RSA keys..."
openssl genrsa -out /home/$USER/sa.key 2048
openssl rsa -in /home/$USER/sa.key -pubout -out /home/$USER/sa.pub
Generate OpenID Connect Discovery and JWKS documents
Now that we have our keys created, we can move on to generating the required documents. We do need to know the issuer url first though, and in this case I'm just generating an Azure Storage Account where the blobs can be public.
# Check if storage account exists
echo "Checking if storage account exists..."
if ! az storage account check-name --name $AZURE_STORAGE_ACCOUNT --query "nameAvailable" --output tsv; then
    echo "Storage account $AZURE_STORAGE_ACCOUNT already exists."
else
    echo "Creating storage account $AZURE_STORAGE_ACCOUNT..."
    az storage account create --name $AZURE_STORAGE_ACCOUNT --resource-group $RESOURCE_GROUP_NAME --location $LOCATION --sku Standard_LRS --allow-blob-public-access true
fi
# Get storage account key
echo "Retrieving storage account key..."
export AZURE_STORAGE_KEY=$(az storage account keys list --account-name $AZURE_STORAGE_ACCOUNT --resource-group $RESOURCE_GROUP_NAME --query "[0].value" -o tsv)

# Create storage container
echo "Creating storage container..."
az storage container create --name $AZURE_STORAGE_CONTAINER --account-name $AZURE_STORAGE_ACCOUNT --account-key $AZURE_STORAGE_KEY --public-access blob
Forming the issuer url is just combining the account blob endpoint and container name, and specifying a path where the JWKS is found.
# Generate discovery document
echo "Generating OpenID Connect discovery document..."
cat <<EOF > openid-configuration.json
{
  "issuer": "https://${AZURE_STORAGE_ACCOUNT}.blob.core.windows.net/${AZURE_STORAGE_CONTAINER}/",
  "jwks_uri": "https://${AZURE_STORAGE_ACCOUNT}.blob.core.windows.net/${AZURE_STORAGE_CONTAINER}/openid/v1/jwks",
  "response_types_supported": [
    "id_token"
  ],
  "subject_types_supported": [
    "public"
  ],
  "id_token_signing_alg_values_supported": [
    "RS256"
  ]
}
EOF
The JWKS can be created from the public key we previously created. The azwi cli has a helper to do just that.
# Generate JWKS document
echo "Generating JWKS document..."
azwi jwks --public-keys /home/$USER/sa.pub --output-file jwks.json
Host the documents in a publicly available endpoint
We have our documents, and we have our storage container publicly available. Now we just need to get the documents hosted on it. Note the paths of the files. They are important.
# Upload discovery document
echo "Uploading discovery document to Azure Storage..."
az storage blob upload \
  --container-name "${AZURE_STORAGE_CONTAINER}" \
  --file openid-configuration.json \
  --name .well-known/openid-configuration \
  --account-name $AZURE_STORAGE_ACCOUNT \
  --account-key $AZURE_STORAGE_KEY \
  --overwrite

# Upload JWKS document
echo "Uploading JWKS document to Azure Storage..."
az storage blob upload \
  --container-name "${AZURE_STORAGE_CONTAINER}" \
  --file jwks.json \
  --name openid/v1/jwks \
  --account-name $AZURE_STORAGE_ACCOUNT \
  --account-key $AZURE_STORAGE_KEY \
  --overwrite
We can also verify the upload worked
# Verify discovery document
echo "Verifying discovery document..."
curl -s "https://${AZURE_STORAGE_ACCOUNT}.blob.core.windows.net/${AZURE_STORAGE_CONTAINER}/.well-known/openid-configuration"

# Verify JWKS document
echo "Verifying JWKS document..."
curl -s "https://${AZURE_STORAGE_ACCOUNT}.blob.core.windows.net/${AZURE_STORAGE_CONTAINER}/openid/v1/jwks"
Configure Kubernetes Cluster
I'm using minikube for these examples, so the configuration on a "real" environment will be a little bit different. However, similar steps are required on both.
First of all, I needed to add my user to the docker group.
sudo usermod -aG docker $USERThen on the first cluster start I needed to make the private and public keys available in the minikube cluster.
minikube start
minikube cp /home/$USER/sa.key /var/lib/minikube/certs/sa.key
minikube cp /home/$USER/sa.pub /var/lib/minikube/certs/sa.pub
minikube stop
Now we can finally start the cluster with additional configuration that will...
- Specify the Service Account Token Issuer URL to point to our storage account
- Specify the private key used for signing Service Account tokens
- Specify the public key to be used for validating Service Account tokens
- Configure the controller manager to use our private key to manage Service Account tokens
echo "Starting Minikube with new config..."
minikube start \
  --extra-config=apiserver.service-account-issuer="https://${AZURE_STORAGE_ACCOUNT}.blob.core.windows.net/${AZURE_STORAGE_CONTAINER}/" \
  --extra-config=apiserver.service-account-signing-key-file="/var/lib/minikube/certs/sa.key" \
  --extra-config=apiserver.service-account-key-file="/var/lib/minikube/certs/sa.pub" \
  --extra-config=controller-manager.service-account-private-key-file="/var/lib/minikube/certs/sa.key"
Create an Entra ID app registration or a user assigned managed identity, and the Kubernetes service account
Our cluster is running, but the Entra side needs to be set up. This can be done with either the azwi cli or using the Bicep Graph extension. These steps have a bit of chicken-and-egg problem as for the service account creation the app registration ID is required, and for the federated identity credential, the subject identifier needs to know the namespace and the name of the service account.
Let's first create the Entra ID app registration. See full code here.
extension microsoftGraphV1_0

resource appReg 'Microsoft.Graph/applications@v1.0' = {
  displayName: 'phcloudbrewkubeid'
  uniqueName: 'phcloudbrewkubeid'
  identifierUris: [
    'api://phcloudbrewkubeid'
  ]
  signInAudience: 'AzureADMyOrg'
  // This part probably is not needed
  requiredResourceAccess: [
    {
      resourceAppId: '00000003-0000-0000-c000-000000000000'
      resourceAccess: [
        {
          // User.Read
          id: 'e1fe6dd8-ba31-4d61-89e7-88639da4683d'
          type: 'Scope'
        }
      ]
    }
  ]
}

resource appRegSp 'Microsoft.Graph/servicePrincipals@v1.0' = {
  appId: appReg.appId
}

output clientId string = appReg.appId
Then using the output, we can create the namespace and the service account
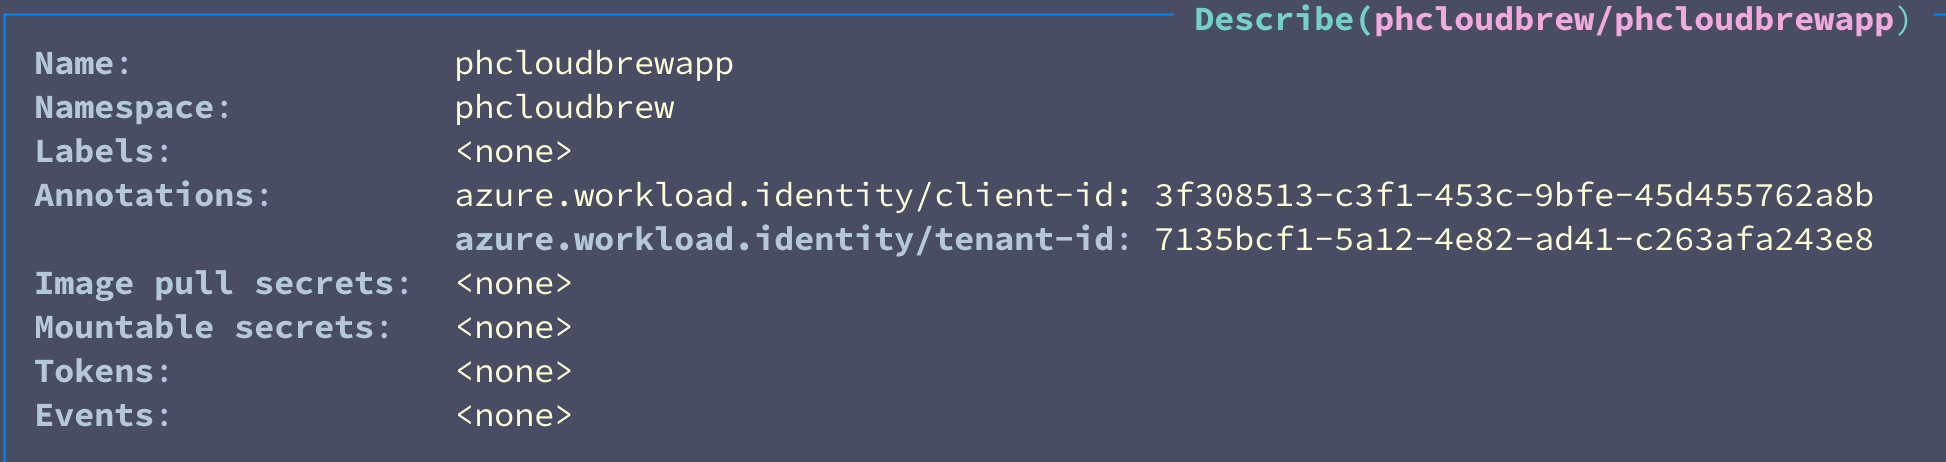
# Use azwi to create the Kubernetes Service Account and link it to the Azure AD application
echo "Linking Kubernetes Service Account with Azure AD application using azwi..."
kubectl create namespace $SERVICE_ACCOUNT_NAMESPACE

azwi sa create phase service-account\
  --service-account-namespace $SERVICE_ACCOUNT_NAMESPACE \
  --service-account-name $SERVICE_ACCOUNT_NAME \
  --aad-application-client-id $AAD_APPLICATION_ID
Now we can create the federated identity credential with the info we've gathered.
extension microsoftGraphV1_0

@description('The issuer of the federation. In this demo, format should be https://SOMEACCOUNT.blob.core.windows.net/SOMECONTAINER/')
param issuer string
@description('The subject of the federation. In this demo, format should be system:serviceaccount:SERVICE_ACCOUNT_NAMESPACE:SERVICE_ACCOUNT_NAME')
param subject string

resource federation 'Microsoft.Graph/applications/federatedIdentityCredentials@v1.0' = {
  name: 'phcloudbrewkubeid/KubeFederation'
  issuer: issuer
  subject: subject
  audiences: [
    'api://AzureADTokenExchange'
  ]
}
Also remember to set up your required permissions to this app registration. I'm doing that in the Bicep too.
// main.bicep
module keyVaultUser '../application/modules/keyvaultUser.bicep' = {
  name: 'keyVaultUser-phcloudbrewkubeid'
  params: {
    keyVaultName: keyVaultName
    identityPrincipalId: appRegSp.id
    role: 'Key Vault Secrets User'
  }
  scope: resourceGroup(keyVaultResourceGroup)
}

// keyvaultUser.bicep
param keyVaultName string
param identityPrincipalId string
@allowed([
  'ServicePrincipal'
  'Group'
  'ForeignGroup'
  'User'
])
param principalType string = 'ServicePrincipal'
@allowed([
  'Key Vault Administrator'
  'Key Vault Secrets User'
])
param role string

var roleIds = {
  'Key Vault Administrator': '00482a5a-887f-4fb3-b363-3b7fe8e74483'
  'Key Vault Secrets User': '4633458b-17de-408a-b874-0445c86b69e6'
}

resource keyVault 'Microsoft.KeyVault/vaults@2023-07-01' existing = {
  name: keyVaultName
}

resource keyVaultRole 'Microsoft.Authorization/roleAssignments@2020-08-01-preview' = {
  name: guid('${keyVault.id}-${identityPrincipalId}-${roleIds[role]}')
  scope: keyVault
  properties: {
    roleDefinitionId: subscriptionResourceId('Microsoft.Authorization/roleDefinitions', roleIds[role])
    principalId: identityPrincipalId
    principalType: principalType
  }
}
Configure and deploy the azwi Mutating Admission Webhook
Azwi provides a mutating admission webhook which helps injecting required configuration to our pods. Read more about it from here.
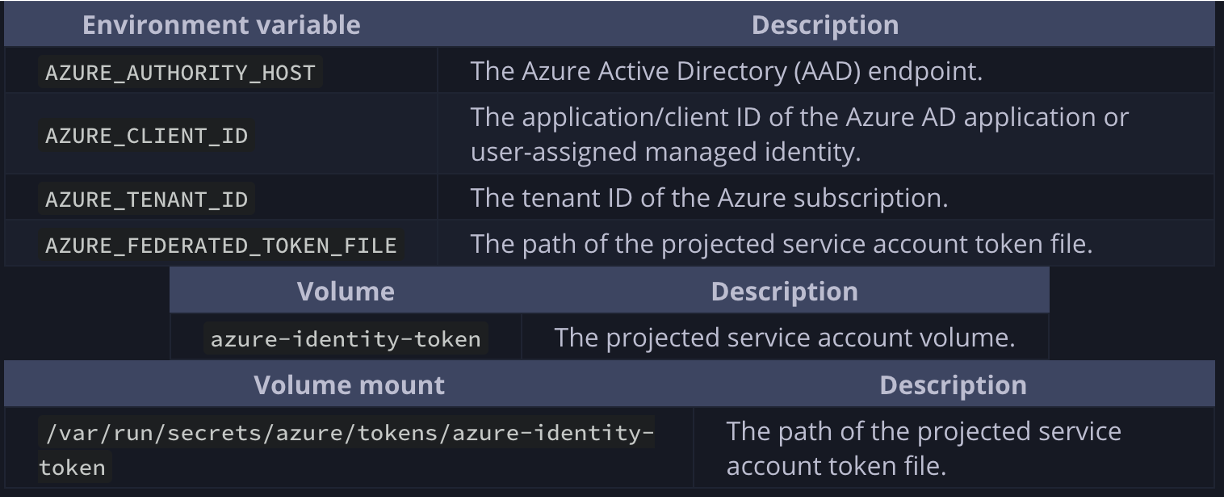
In short, it mounts the service account token to our pods, tells them where to find the token and points it to the correct Entra ID tenant.
# Install Helm
echo "Installing Helm..."
curl https://raw.githubusercontent.com/helm/helm/master/scripts/get-helm-3 | bash

# Add azure-workload-identity Helm repo
echo "Adding azure-workload-identity Helm repository..."
helm repo add azure-workload-identity https://azure.github.io/azure-workload-identity/charts
helm repo update

# Install workload-identity-webhook via Helm
echo "Installing workload-identity-webhook..."
helm install workload-identity-webhook azure-workload-identity/workload-identity-webhook \
  --namespace azure-workload-identity-system \
  --create-namespace \
  --set azureTenantID="${AZURE_TENANT_ID}"
I also needed to restart my minikube cluster after this step, but that might not always be required.
Deploy a workload that utilizes the service account
Now our setup is complete, and we can deploy a tester container with this information. I'm just using a Microsoft provided quickstart image that pings a key vault.
export KEYVAULT_SECRET_NAME="hellosecret"
export KEYVAULT_URL="https://phcloudbrewkv.vault.azure.net/"
export SERVICE_ACCOUNT_NAME="phcloudbrewapp"
export SERVICE_ACCOUNT_NAMESPACE="phcloudbrew"

cat <<EOF | kubectl apply -f -
apiVersion: v1
kind: Pod
metadata:
  name: secret-getter
  namespace: ${SERVICE_ACCOUNT_NAMESPACE}
  labels:
    azure.workload.identity/use: "true"
spec:
  serviceAccountName: ${SERVICE_ACCOUNT_NAME}
  containers:
    - image: ghcr.io/azure/azure-workload-identity/msal-go
      name: oidc
      env:
      - name: KEYVAULT_URL
        value: ${KEYVAULT_URL}
      - name: SECRET_NAME
        value: ${KEYVAULT_SECRET_NAME}
  nodeSelector:
    kubernetes.io/os: linux
EOF
The important parts there are that we label to pod to use workload identity (and thus get the mutations applied), and we specify the namepace and service account to match.
If we look at the state of our cluster, we should see the following: